


Ok, I stole that title from Bethany's blog, but I really loved it and thought it was appropriate for this post.
In case anyone was wondering, it takes just over 4 hours to bake 400 cookies. 4 hours straight, that is.
Also, in case you were wondering, I will probably not ever do that again.
And, furthermore, I don't even want to think about baking another cookie for a LONG time.
But, I will still share the recipe with you tomorrow.
It was worth all of the effort in the end. The volunteers seemed to really appreciate the goodies and after working on houses all day in the pouring rain, I hope it was a little bright spot for them.
~Nicole
Monday, December 29, 2008
Saturday, December 27, 2008
Habitat for Humanity
About a month ago, my husband read in our local paper that there were volunteers coming to build houses with Habitat for Humanity. They were coming over the holidays, during their vacations, on their own money. He thought this would be a great community service project for my Girl Scout troop to work on. Did I mention I am a Girl Scout Leader?
Anyway, I agreed and promptly called the local organizer. I told her that my troop would love to help out any way we could. She said that their dinners were pretty much covered, but they did need some baked goods for desserts/snacks and would we mind making some cookies. Cookies? Of course, that's right up our alley. Then, she told me there were going to be 200 volunteers coming. I did a big gulp because I knew that there was a strong possibility that I would be baking all of the cookies myself. I mean, I can't force the parents to help out or donate, so I had committed myself and my kitchen to the entire lot, if need be.
When I announced this project at our meeting, the parents didn't seem quite as enthusiastic about it as I was. But, I soldiered on. These wonderful volunteers are coming to build homes for our community. It is nice to know that even though the rest of the world thinks Katrina happened ages ago, some people realize that we are not back to 'normal,' whatever that may be. We have not been forgotten. At the next meeting, I did have 2 parents bring in some cookies. They were store bought ones and while I appreciate the thought, I really feel bad bringing some prepackaged cookies to these wonderful people.
So, for the rest of the evening tonight and probably the majority of the day tomorrow, I will be baking 400 cookies, or more. I will be sharing the recipe with you either tomorrow or Monday along with some tips and pics. Wish me luck!!
~Nicole
Wednesday, December 24, 2008
Stuffed Pepper Pasta
Stuffed Pepper Pasta

2 tbsp extra virgin olive oil
1 and 1/2 lbs ground beef
4 cloves garlic - minced
1 large onion - chopped
3 bell peppers - chopped
1 bay leaf
1 and 1/2 cans of chicken stock (or half of a box)
1 - 28 oz can crushed tomatoes
2 cups any small pasta
grated cheese
Heat olive oil in a soup pot over med-high heat. When oil is hot, add ground beef, salt & pepper. Cook about 5 minutes, or until meat is browned. Drain. Add garlic, onions, bell peppers, & bay leaf. Cook 7-8 minutes, or until veggies are tender. Stir in chicken stock & crushed tomatoes and bring to a bubble. Add pasta & cook 7-8 minutes. Top with grated cheese (cheddar, Parmesan, mozzarella, whatever you like) and serve.
Tuesday, December 23, 2008
Nathan's School Christmas Program
On Friday, Nathan's school had their annual Christmas program. It was adorable. The kids sang 3 songs on their outdoor stage and you could tell they had practiced very hard.
The following captions are what I imagine was going on inside my son's head during the whole experience.
We begin with his walk to the stage...

'I can't believe I have to wear this thing on my head. Maybe if I pull it down over one eye, people won't recognize me.'

'Oh great, Mom brought the camera.'

'I'll just hide behind this kid.'

'Oh no! She's zooming in on my misery.'

'and she's probably going to show people these pictures.'

'More kids came. I'll try to blend in.'

'Hey, those kids look like they are having fun.'

'and so do those kids. Well, if you can't beat em, join em.'
'Jingle Bells, Jingle Bells, jingle all the way.
Oh, what fun it is to ride in a one horse open sleigh.'

'HEY!'
Merry Christmas!!!
Thursday, December 18, 2008
Oven Baked Potato Wedges
This recipe is one of our favorites. Please do not let this alter your opinion of me being a gourmet chef and all. Did you think that? Gosh, I hope not.
Oven Baked Potato Wedges
 You will need: red potatoes, salt, garlic, black pepper, non stick cooking spray and olive oil.
Wash the red potatoes.
Cut them into wedges and place them on a baking sheet that you have sprayed with the cooking spray. I like to cover mine with tin foil to help cut down on clean up. Did I mention that I hate clean up?
Next, mince up a couple of cloves of garlic and toss them with your wedges. If you don't have any on hand, you can sprinkle the potatoes with garlic powder.
Sprinkle the wedges with salt and pepper and drizzle with olive oil.
Place in a 400 degree oven for 30-40 minutes, turning 1/2 way through cooking.

They will look something like this.
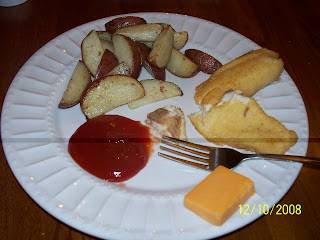
We like to have them with fried fish, as you can clearly see here. They never last long in our house.
Wednesday, December 17, 2008
Another absence...
Its been almost officially a week since my last post. I apologize for the absence. Things have been more than a little hectic with Christmas fast approaching and we are still adjusting to my mother in law living with us. There is still no definite time line on that which makes things tough at times. I also have been dealing with some bad news from my 'home' in New Hampshire. As of today, actually 2 pieces of bad news. Its always hard to hear about family issues when you are so far away and feel like there is nothing you can do. So, I needed to take a little break.
I have been trying to be as productive as possible during my down time, however. My husband has tried to keep me occupied so we spent 3 consecutive nights making jelly.

Here are our little jars all lined up and ready to go.

We will be buying a pressure canner soon, but this one does just fine for our jellies.

This night, we made Mayhaw Jelly, which is actually a state food of Louisiana. (I just learned that today on Jeopardy) The great thing was that a friend of my husband's gave us the mayhaw juice, so that eliminated my least favorite step. But, we had 2 nights of making blueberry jelly. And, we still have a ton of frozen blueberries in the freezer. We ran out of jars, or we might still be canning.
Jelly making was our first attempt at canning and we have done really well. We are even planting extra tomatoes in our garden to try putting them up. We think we are up for the additional challenge.
Do you do any preserving? If so, what? Any tips you'd like to share?
I will be posting in the morning. I am trying to work on new recipes so hopefully I will be having more to share soon.
Happy Holidays!!!!!
Thursday, December 11, 2008
Snow Day!!!
Never in 100 million years did I think that my children would have a snow day in South East Louisiana, but today it happened. Good thing too because I woke up late and the kids would've been tardy if I had to get them there.

This was the sight we woke up to this morning


(Please ignore the date stamp on the photos below, they are the result of having to change batteries mid-shoot.)
This was the sight we woke up to this morning
It was very shocking!
This is our garden...oops!

Madison jumped right in
It wasn't long before she was in a snowball fight with one of her friends.

Lauren was a little more reserved

But, she got the idea

and soon threw her first snowball

Nate was excited, but I think it had more to do with him getting to stay home from school

But, he too, got in on the action

He even helped the neighbor and other kids make a snowman

He turned out pretty cute

Lauren got wet and a little disgusted

Madison learned first hand what happens when a stray snowball lands in the eye region
and here's what she thinks about that
Wednesday, December 10, 2008
Soup Weather
I get excited for fall every year for 2 reasons. One, I can finally stop sweating. And two, its soup weather. We LOVE making homemade vegetable beef soup. (I will share that recipe soon) We also like chowders and cream based soups. Sunday night, I made a new favorite of ours that was shared with us by one of my husband's co-workers.
Easy Broccoli Cheese Soup
1/2 stick butter/margarine
1/2 cup chopped green onions
8 oz. Velveeta
2 cans Cream of Broccoli soup
1 can Cream of Mushroom soup
1 can Cream of Onion soup
1 package frozen chopped broccoli - thawed
4 - 1/2 full soup cans of milk
Melt butter/margarine in dutch oven over medium low heat. Add green onions and saute for 2 minutes. Begin adding your soups. Pour milk into the empty cans to fill 1/2 way. Add the milk to the pot and stir well.
Cut the Velveeta into cubes and add to the pot. You will want to stir often because the cheese will sink to the bottom and burn if you are not careful. After the cheese is melted, add the chopped broccoli to the pot and stir well. (This is where we also add 2 packages of thawed crawfish tails, but you can leave them out) Turn the heat down to low and continue to cook until the broccoli is warmed and the soup has thickened.
Stuffed Pistolettes
1 bag Pistolette rolls
8 oz Velveeta
1 pound ground beef
1 package frozen chopped broccoli - thawed
Brown ground meat in large sauce pan. Drain. Cut Velveeta into cubes and add to the pan and cook over medium low heat. Stir often to avoid burning while the cheese is melting. When the cheese is completely melted, add the thawed broccoli and mix well.
Cut the top 1/3 off of the pistolette rolls and throw away. Scoop out MOST of the inside of the roll leaving just a bread shell with a LITTLE bit of the inside left. Scoop the stuffing mixture into the pistoletts and place on a baking sheet. Bake in the oven at 400 degrees for about 10 minutes, or until the rolls are browned and a little crispy.
~Nicole
Tuesday, December 9, 2008
Update on the homelife
Good Afternoon!!
I'm sorry for my temporary absence. My Mother in Law was released from the hospital to our house last Friday at 4 pm and I am still recovering. We had to move bedrooms around to make room for her and I am just now catching up with everything.
Also, it is taking me awhile to figure out what she likes to eat because everything I have made so far, she doesn't enjoy. Not even a little bit. Not even at all. Well, she did like the bagged salad I bought and topped with rotisserie chicken from the store, but I can't really claim that I made that.
I will be back tomorrow as regularly scheduled with a new recipe or two and hopefully a kitchen tip.
In the meantime, click on the recipe link on the right hand side of the page and enjoy some of our favorites.
~Nicole
Friday, December 5, 2008
Blueberry Muffins - 2 ways
This year was a bumper crop for our blueberry bushes. I didn't like going out in the hottest days of summer for hours picking them, only to turn around and have to do it again 2 days later. But, I am loving having a ton of frozen blueberries in my freezer.
Blueberry Yogurt Muffins
3 cups AP flour
1 tablespoon baking powder
1/2 teaspoon baking soda
1/2 teaspoon salt
10 tablespoons butter/margarine - softened
1 and 1/2 cups sugar
2 large eggs
1 and 1/2 cups plain yogurt
1 teaspoon grated lemon peel
1 and 1/2 cup blueberries - thaw, if frozen
1 tablespoon flour - to toss with the blueberries
Preheat oven to 375 degrees.
Sift together dry ingredients - set aside.
In large mixing bowl, cream butter/margarine and sugar together until fluffy. Add eggs, one at a time, beating well. Beat in grated lemon peel.
Beat in 1/2 of the dry ingredients. Beat in 1/3 of the yogurt. Add 1/2 of the remaining dry ingredients and beat until incorporated. Beat in second 1/3 of yogurt. Finish by beating in the remaining dry ingredients, then the remaining yogurt. Do NOT over beat - just until the ingredients are incorporated.
Toss blueberries with the 1 tablespoon of flour.
TIP: Tossing the berries with the flour keeps them from sinking to the bottom of the muffins while baking.
Grease muffin pan and fill. Bake 25-30 minutes, until toothpick comes out clean.
Diabetic Blueberry Muffins
2 cups AP flour
2 teaspoons baking powder
3/4 teaspoon salt
1/2 stick light margarine - softened
1 cup Splenda
1/4 cup honey
2 large eggs
1 teaspoon vanilla
3/4 cup milk
1 cup blueberries - thaw, if frozen
Preheat oven to 350 degrees. Spray muffin tray with cooking spray.
Sift together dry ingredients - set aside.
Beat together margarine, Splenda and honey until fluffy. Add eggs one at a time, beating well after each addition. Stir in vanilla. Add 1/2 of flour mixture and beat well. Beat in the milk. Add remaining flour and beat until all is well blended. *Add more milk, if needed to incorporate all the dry ingredients.
In a small bowl, toss the blueberries with 2 tablespoons of flour. This keeps them from sinking to the bottom of the muffins while baking. Fold into the muffins.
Spoon batter into muffin tray and bake 25-30 minutes, until toothpick comes out clean.
Do you like blueberries? Let me know. Post a comment by clicking on the comment link. I've got a ton more blueberry recipes to share, if you want 'em.
~Nicole
Thursday, December 4, 2008
Chicken and Broccoli Alfredo
I'm still working on the muffins, so in the meantime, who wants pasta???
Chicken & Broccoli Alfredo
8 oz. linguine
1 cup fresh broccoli florets
2 tablespoons butter/margarine
1 lb boneless/skinless chicken breasts - cubed
1 can cream of mushroom soup
1/2 cup milk
1/2 cup grated Parmesan cheese
1/4 teaspoon black pepper
Prepare linguine according to box directions. Add broccoli during the last 4 minutes of cooking time. Drain.
Heat butter in skillet over medium high heat. Add chicken and cook until well browned, stirring often.
Reduce heat to medium. Stir soup, milk, cheese and pepper into skillet. Mix well. Add linguine and broccoli and toss well to coat. Heat until hot and bubbling, stirring occasionally. Serve with additional cheese.
~Nicole
Wednesday, December 3, 2008
Today's recipe is brought to you by....Madison!!!
I spent a small fortune on Icees this summer. It was unbearable heat and we were already having trouble with the AC at home, so every time we got in the car, the kids were begging for Icee refreshment.
But, then I found this wonderfully easy recipe. Madison loves them and makes them almost completely by herself. She has been wanting me to post this ever since I started this blog, so here goes...
Slushies
2 cups cold water
1 packet fruit flavored drink mix - like Koolaid, or your favorite store brand
2/3 cup sugar
1 full tray of ice cubes
Place all ingredients into blender and process on high for 1 minute. Stop, stir and process again, if needed. Serve immediately.
I am working on some muffin recipes and if all goes well, I will share a few of them with you tomorrow.
Happy Cooking,
Nicole
Tuesday, December 2, 2008
Italian Shells
This one is a personal fave. Its quick and simple to put together and we always have a ton of leftovers.
Italian Shells
1 package jumbo shells
1 lb ground beef
1 lb ground Italian sausage
15 oz ricotta cheese
3 cups shredded mozzarella cheese, or Italian blend
1/2 teaspoon garlic powder
1/2 teaspoon Italian seasoning
salt and pepper to taste
1 jar spaghetti sauce
grated Parmesan cheese
Cook shells and drain. Cover with cold water and set aside.
Brown both ground beef and sausage together. Drain. Add seasonings and cheeses.
Preheat oven to 350 degrees. Lightly spray a 9x13 inch baking dish. Remove shells from water. Fill with meat and cheese mixture. Place in baking dish. If there is any filling left, spoon it over top as evenly as possible. Cover with sauce. Sprinkle with Parmesan cheese and bake for 45 minutes. YUMMY!!!
Happy Cooking!
Nicole
Monday, December 1, 2008
Beef Enchilada Casserole
Good Monday Morning!!! I am soooooooo happy Thanksgiving is over for another year. I love the gathering of friends and family but I detest all the cleaning. Luckily, we were left with a ton of leftovers and I haven't really had to cook much since. But, I thought I would share one of our favorite casseroles today. It is quick and easy and the kiddos gobble it up every time.
Beef Enchilada Casserole
1 lb. ground beef
1 - 6 oz can tomato paste
2 cups hot water
2 cups shredded cheese - cheddar, Mexican blend, whatever you like
1 teaspoon salt
1 teaspoon onion powder
2 teaspoons chili powder
1 teaspoon cumin
1/2 teaspoon garlic powder
dash of black pepper
1 package soft corn tortillas
Brown ground meat. While browning, mix together warm water and tomato paste. This will take a few minutes to mix. Set aside. Drain ground beef.
Add all of the seasonings into the tomato mixture and pour 1/2 of it into the ground beef. Also, add 1/2 of the cheese. Mix well.
Spray a 9x13 inch casserole with cooking spray. Pour about 1/4 cup of the tomato sauce mixture in the bottom of the pan and spread around. Using 6 corn tortillas, cover the bottom of the pan. Cover the tortillas with a few scoops of the ground meat mixture. Continue to alternate layers of tortillas and meat, ending with tortillas. Pour the remaining tomato sauce over top of the tortillas and scatter the remaining cheese on top.
Bake uncovered at 350 degrees for 30 minutes.
Happy Cooking,
Nicole
Thursday, November 27, 2008
Happy Thanksgiving Everyone!!!!
Good morning!
I wish that you all will have a Happy Thanksgiving and you will take time to enjoy your family/friends.
We will be having our Thanksgiving feast tomorrow due to family medical issues. So, I will still be cooking up a storm in preparation of our big meal.
HAPPY THANKSGIVING!!!!!
I wish that you all will have a Happy Thanksgiving and you will take time to enjoy your family/friends.
We will be having our Thanksgiving feast tomorrow due to family medical issues. So, I will still be cooking up a storm in preparation of our big meal.
HAPPY THANKSGIVING!!!!!
Wednesday, November 26, 2008
Yummy Pecan Pie
I had never had pecan pie until I moved to the South. My first Thanksgiving here in Louisiana, my Mother in Law made me a pumpkin pie, something they had never eaten, to make me feel at home. It took me a while to warm up to the pecan pie. It was way too sweet, I thought. Who could eat that? But, it was only a matter of time before I was in love with the rich, gooey, sugary goodness that is the classic Pecan Pie. Never had one? Don't think you will like it? Try it, try it and you may.
Pecan Pie
1/2 cup Light Corn Syrup - I use Karo
1/2 cup Dark Corn Syrup - again, Karo
3 eggs
1 cup sugar
2 tablespoons butter/margarine - melted
2 teaspoons vanilla
1 and 1/2 cups pecans
1 unbaked 9 inch pie shell - regular, not deep dish
Stir together the corn syrups, eggs, sugar, butter/margarine and vanilla. Mix in pecans. Pour into pie crust.
Bake in center of oven at 350 degrees for 1 hour. Cool for at least 2 hours to let it finish 'setting up.'
TIP - Do NOT double the batch!!!! I have done this a few times and had dismal results. If you want to bake 2 at once, mix up the ingredients for each pie separately.
Happy Thanksgiving!!!!
~Nicole
Tuesday, November 25, 2008
Fudge Brownies - from scratch and easy
I used boxed brownie mixes for a long time, until I found this recipe for homemade fudge brownies. We like them better than the boxed ones and they are pretty simple to make.
Fudge Brownies
2 sticks melted margarine
2 cups sugar
4 eggs
1/2 teaspoon salt
1/2 cup unsweetened cocoa
1 teaspoon vanilla
1 and 1/4 cup flour
Melt margarine. Combine margarine and sugar in large bowl with whisk. Add eggs and whisk until fluffy. Add salt, cocoa and vanilla. Stir well. Add flour. Stir until mixture is thick and chocolaty. Turn into a well oiled 9 x 13 pan. Bake at 350 degrees for 25-30 minutes.
Remove from oven and cool before cutting.
~Nicole
Monday, November 24, 2008
Chicken and Dumplings
Ok, its confession time. When my husband and I were first married, I didn't know how to cook 'Southern' food. I only knew how to cook what he called 'bland' food. So, I went out and bought some cookbooks. And, I tried to learn some of his favorites from my Mother in Law. I was told several recipes that included lines like, 'just add some flour - however much you think is right,' 'just cook it until you think its done,' and, my personal fave, 'just throw in what looks good to you.' From this precise teaching method, its no wonder my first go round with roast, rice and gravy turned into roast, rice and brown water. And, my first fried chicken looked divine on the outside and bloody as the day it died on the inside.
The cookbooks I bought were called, 'Make it in the Microwave,' '5 Ingredients or Less,' and '30 Minutes or Under.' My husband told one of his friends one day that I never made anything that contained more than 5 ingredients and took less than 30 seconds to whip up in the micro. That was not entirely true, but close. Then, I found some shortcuts and now can make several of his favorites. Today, I will share one. Please don't look down upon me because of the simplicity - sometimes I do make things that are a little more complicated.
Chicken and Dumplings
4-5 pounds of chicken pieces (do NOT use skinless - it will add flavor)
2 cans of cream of chicken soup
1 four pk of Pillsbury Flaky Layers biscuits (they come wrapped in a 4 pk - get the brown ones)
salt and pepper to taste
flour
Place chicken in large pot and cover with water. Boil until the chicken falls away from the bone. Drain and reserve the cooking water.
When it is cool enough to touch, debone the chicken. Add the chicken meat back into the cooking water. Toss the bones and skin - their job is done.
Turn the burner back on high and stir in the 2 cans of cream of chicken soup. Bring to a boil.
Pick a spot on your counter and coat with flour. Separate the biscuits and roll out in the flour. Cut each biscuit into 8 pieces and drop them into the pot, one at a time. You will have to push the pile under the water during this process. When all of the 'dumplings' are in the pot, turn it down to medium low and let it simmer until all of the dumplings have 'dropped' below the surface and don't float back up.
*PLEASE, PLEASE, PLEASE stir frequently or they will burn on the bottom. Thank you*
Now, turn the heat off and leave the pot alone for at least 30 minutes. The longer they sit, the better they taste. After the time is up, you can season to taste in the pot or let each person season their own bowl. Enjoy.
Be sure to save the leftovers - they are even better the next day.
~Nicole
Friday, November 21, 2008
Rice Recipes for Thanksgiving
Thanksgiving is officially less than a week away and I think I have a game plan. I have made a list of all the prep work that can be done in advance. The plan is to make all of the desserts, boil the chicken, prepare the 2 rice dishes, make the deviled eggs, set up the veggie tray, and get the dumplings made on Wednesday. That will leave Thursday a little less busy than usual and hopefully I will be able to enjoy the holiday and our guests this year. My Nana hosted Thanksgiving dinner for 20+ people for several years. There is no end to the admiration I have for that woman.
So, in the holiday spirit, I am going to share with you the recipes to the 2 aforementioned rice dishes. They are dishes that I had never had until I moved to the South and they are sure to be on many southern Thanksgiving tables. Oh, and they're delish. Give 'em a shot.
Broccoli Rice Casserole
2 cups cooked rice - make life simple and use Minute Rice
1 can cream of mushroom soup
1 lb Velveeta
2 packages frozen chopped broccoli
1/4 cup butter/margarine
Cook rice.
Combine soup, Velveeta and butter in large saucepan. Cook until well blended. Mix together broccoli, rice and cheese sauce. Pour into a buttered casserole and bake at 375 degrees for 1 hour uncovered.
Easy Rice Dressing
aka Dirty Rice
1 lb ground chuck - browned
1 can cream of mushroom
1 can French Onion Soup
1 cup uncooked rice
1 chopped bell pepper
1 chopped onion
1/2 cup chopped green onion
salt and pepper to taste
Mix thoroughly all ingredients together in the order listed above. Place in greased casserole. Cover and bake at 325 degrees for 1 and 1/2 hours. Stir with fork and re-cover. Let sit for 15 minutes before serving.
Happy Cooking,
Nicole
Thursday, November 20, 2008
Shrimp Scampi
If you love shrimp, you must try this. It is super simple and very quick and easy to make.
Shrimp Scampi
1 lb angel hair pasta
4 cloves of garlic - chopped
2 tbsp olive oil
4 tbsp butter
1 lb small shrimp
salt & pepper to taste
pinch of red pepper flakes - optional
1 and 1/2 cups chicken stock
parsley - chopped
Cook pasta to al dente. Drain, set aside.
Heat oil over medium heat. Add butter. When the butter is melted, add garlic and cook for 2 minutes.
Add shrimp, salt & pepper and red pepper flakes. Cook 2 minutes, flip shrimp over and cook another 2 minutes. Add stock and turn up heat, bringing to a boil. Add pasta to the sauce and toss to coat. Turn down the heat to just a simmer and finish cooking the pasta until tender. This will allow the noodles to soak in some of the sauce while finishing cooking. Remove from heat and top with chopped parsley.
Happy Cooking,
Nicole
Wednesday, November 19, 2008
Crawfish Galore
Its Wednesday - I'm exhausted. The kiddos were all up VERY late last night and when they finally went to sleep, what did I do? Did I lay down and catch some ZZZZ's myself? No, I did what any overly-tired mother of 3 who is stressed out from all the work I have to do before the in-laws come for Thanksgiving. I read. I read and read and read. It was a really good book, but I stayed up much too late and woke up much too late and had to explain to the office at my daughters' school why she was late. Car trouble, of course.
I had a plan to post a recipe with step by step pics like The Pioneer Woman, but instead you will have to settle for 2 very yummy crawfish recipes that I have made several times. (If you don't like crawfish, or can't find them in your store's freezer section, try these recipes without them - they are still fabulous) I currently have 10 - 12oz. packages in my freezer.
Crawfish Cornbread
(I made this for Thanksgiving last year instead of cornbread dressing and everyone loved it.)
1 cup cornmeal
1/2 cup vegetable oil
2 eggs
1 cup chopped onion
1/4 cup chopped bell pepper
1 can cream style corn
1/4 cup jarred/canned jalapeno pepper, chopped
1 tsp baking soda
1 and 1/2 cup shredded cheddar cheese
1 pound drained crawfish (I use 12oz frozen packages)
Combine all ingredients in a large bowl. Spray a large casserole dish with cooking spray and add the mixture. Bake at 375 degrees for 50-60 minutes, or until golden brown.
TIP: I buy pot pie sized foil pans at the store and make individual cornbreads. They are always a hit.
Crawfish Corn Chowder
(This would be a wonderfully delicious creamy corn chowder if you want to leave the crawfish out)
1/2 stick butter
1 bunch green onions
8 oz. cream cheese - cut into cubes
1 can cream of mushroom soup
2 cans cream of potato soup
2 cans niblets corn (undrained)
16 oz. 1/2 and 1/2
1 lb crawfish tails
Melt butter in saucepan. Saute onions in butter. Add cream cheese and all 3 cans of soups. Don't dilute the soups! Add both cans of corn and crawfish tails. Mix well. Season with Tony Chacheries, or any other cajun seasoning. Add 1/2 and 1/2. Cook on very low heat, stirring often until thickened.
Again, even if you aren't a fan of crawfish, or can't find it in your local grocery store, please give these a shot. They will not disappoint.
Happy Cooking,
Nicole
Tuesday, November 18, 2008
Kitchen Tip Tuesday: Boiling Eggs
My Nana taught me this years ago and it is the best way I have found to boil eggs. They come out perfect every time.
Place eggs in your saucepan/pot. Cover with cold water. Place on stove and turn the burner on high. When the water comes to a rolling bowl, start a timer for 10 minutes. At the end of the 10 minutes, drain the hot water and place the pan in the sink. Begin running cold water over the eggs to cool. Proceed to peel as normal.
BONUS TIP: If you are making deviled eggs, turn the eggs over in the carton the day before you will boil them and the yolk will be perfectly centered when finished.
Click here for more Kitchen Tips
Monday, November 17, 2008
Orange Julius Copycat Recipe
These were a favorite of mine whenever we went to the mall. I like the strawberry banana ones too, but here is a recipe for the classic. Enjoy!
Copycat Orange Julius
6 oz. can frozen concentrated orange juice
1 cup milk - low fat works fine
1 cup water
1/4 cup granulated sugar - splenda works too
1 tsp. vanilla extract
8 ice cubes
Pour all ingredients in a blender - blend until smooth.
Yummy!!!
Copycat Orange Julius
6 oz. can frozen concentrated orange juice
1 cup milk - low fat works fine
1 cup water
1/4 cup granulated sugar - splenda works too
1 tsp. vanilla extract
8 ice cubes
Pour all ingredients in a blender - blend until smooth.
Yummy!!!
LSU vs. Troy
Thank goodness its Monday. Back to routine. I have a ton of housework to do, but I don't wanna do it, so I decided to post.
On Friday, my husband was given 3 tickets to the LSU football game. Madison loves LSU so we asked my sister in law to watch the 2 little ones and off we went.

Here's Madison on our way to the game

It was a 2 hour drive, plus a 2 mile walk to the stadium, but it was all worth it when she got her nachos.

We got there a little early

Here's a view from our seats

see those people way up there? I would never sit there.

see the mascot? That's Mike, the Tiger. Madison loves him.

It was 20 something with the wind chill. I felt very sorry for those girls.

With a lot of bundling, we still froze and left before halftime. (LSU was getting beat, but eventually came back to win) A good time was had by all.
Tuesday, November 11, 2008
My First Product Review: Balls' Blue Book of Preserving
When I moved to the South 9 years ago, I never really thought that it would change me. I mean, I grew up in nowhereville NH and moved to nowhereville LA, how different could it be? Boy, was I wrong. Since then, I have fried gizzards, made cornbread dressing, said 'fixin to,' planted a garden, described sweating as 'puddling,' and have made my own jelly. Now, I'm sure that its not just Southerners who do all of these activities, but never in a million years did I dream that I would. No one I knew had ever done these things.
We were in Walmart the other day looking in my favorite aisle, the kitchen gadgets, when my husband noticed the canning supplies were on clearance. There was a book among the mix. He decided it would help with our canning (which means my canning) so we bought it. I was not prepared for the neverending love I would find for this book.
Balls' Blue Book of Preserving

It has several step-by-step instructional pages.

Like canning tomatoes

freezing corn

dehydrating apples

and even a problem solver page to help with common
canning issues.
(Please forgive the pictures, I am no Pioneer Woman but I am working on it.)
The book is full of recipes and the Amazon reviewers call it the Bible of canning. It is a must have for anyone who wants to can/preserve/freeze/dehydrate/pickle anyfood. This book is great for beginners because it simplifies the processes and has several step by step tutorials. The pictures are beautiful and the recipes are delicious. A must read for all home preservers.
Monday, November 10, 2008
Lauren
Good morning everyone! Finally, we have the much anticipated part 3 of 'Meet the Fam.'
Today's contestant is our youngest, Lauren.

Sometimes, I like to call her Samurai baby.

She is a very entertaining child. Just look at the faces she makes.

see?

what I mean?

about the faces?

oops, wait...that's not her

there we go...again.

But, she doesn't always want to look like a goof,
so she uses her sisters' make up to make herself 'pitty.'

and, she likes to share...sometimes

and, did I mention, that she is a complete angel?
Subscribe to:
Posts (Atom)
